Basic UI for sign in and sign up

When I was first trying to decide what to make as the first “feature”, I figured user management was a good place to start. With Angular and ExpressJS playing somewhat nicely together, the next step is to get some users up and running. This will require a client-side piece – providing user information, as well as a server-side piece – storing information securely, validating provided information, and managing sessions.

There are two ways we can approach this – ultimately we’ll need to do both, so I don’t think it really makes much difference. Either we do the back end first or we do the front end first. Both strategies will require mocking the other part. If we do the back end first then we’ll need to govern the interactions right off the bat with test infrastructure or manually posting data. If we do the back end first, the whole “authentication” and “validation” phase will just be a stub. Both create the possibility for a design which doesn’t complement the other, so I don’t think it really matters too much. I’ll start with the UI just because I’m antsy to get something to look at with this web app.

Starting point

Over in the Angular set up post we got this killer app up and running:

capture

Goal

  • Create a publicly accessible landing page, the default when visiting the app
  • Create a “profile” page accessible only to logged in users accessible through some kind of navigation element
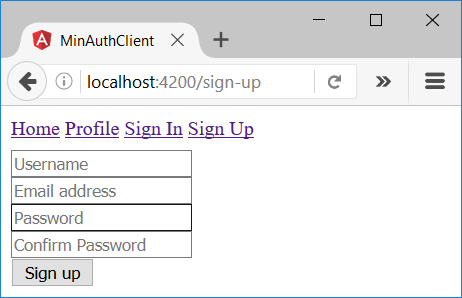
  • Create a sign up page for new users – form with username and password and a “sign up” button
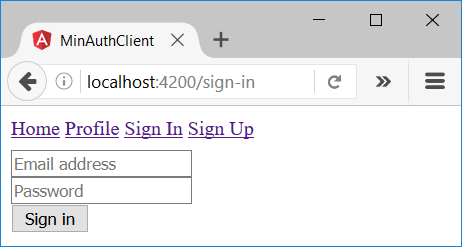
  • Create a sign in page for existing users – form with username and password and sign out button
  • Create persistent indication of whether the user is signed in or signed out

What this looks like at this stage is not really much of a consideration at this point, the important part right now is getting this all working.

Doing it

We’ll need at least 4 “pages”: landing, sign up, sign in, and a profile. Additionally, it’d be nice to have a static header for navigation as persistent place to put all this stuff. Let’s generate a bunch of placeholders quickly:

$ ng g c landing
installing component
 create src\app\landing\landing.component.css
 create src\app\landing\landing.component.html
 create src\app\landing\landing.component.spec.ts
 create src\app\landing\landing.component.ts
 update src\app\app.module.ts

$ ng g c sign-up
installing component
 create src\app\sign-up\sign-up.component.css
 create src\app\sign-up\sign-up.component.html
 create src\app\sign-up\sign-up.component.spec.ts
 create src\app\sign-up\sign-up.component.ts
 update src\app\app.module.ts

$ ng g c sign-in
installing component
 create src\app\sign-in\sign-in.component.css
 create src\app\sign-in\sign-in.component.html
 create src\app\sign-in\sign-in.component.spec.ts
 create src\app\sign-in\sign-in.component.ts
 update src\app\app.module.ts

$ ng g c profile
installing component
 create src\app\profile\profile.component.css
 create src\app\profile\profile.component.html
 create src\app\profile\profile.component.spec.ts
 create src\app\profile\profile.component.ts
 update src\app\app.module.ts

$ ng g c header
installing component
 create src\app\header\header.component.css
 create src\app\header\header.component.html
 create src\app\header\header.component.spec.ts
 create src\app\header\header.component.ts
 update src\app\app.module.ts

Let’s get the basic routing out of the way to start – add the header as a persistent element right to the root element.

// app.component.ts 

+ import { HeaderComponent } from './header/header.component';
 
 @Component({
   selector: 'app-root',
   template: `
+

Strip the root element of anything other than the header and the router outlet:

// app.component.ts
...
- <h1>
- {{title}}
- </h1>
 <router-outlet></router-outlet>
 `,
 styles: []
})
- export class AppComponent {
-   title = 'app works!';
- }
+ export class AppComponent {}

Replace what was previously the app root with the landing page:

// app-routing.module.ts

... 
+ import { LandingComponent } from './landing/landing.component';
 
const routes: Routes = [
- {
-    path: '',
-    children: []
-  }
+  { path: '', component: LandingComponent }
];
...

Now we have this beautiful evolution of the previous page (ooooh, ahhhhh):

capture

Lets set up the navigation for the rest of the “pages”. To do so, we’ll use the header for everything just because it’s a relatively conventional thing and it’s easy at this point. For the first pass we’ll do the bare minimum:

// app-routing.module.ts

... 
+ import { LandingComponent } from './landing/landing.component';
+ import { ProfileComponent } from './profile/profile.component';
+ import { SignInComponent } from './sign-in/sign-in.component';
+ import { SignUpComponent } from './sign-up/sign-up.component';
 
 const routes: Routes = [
-   {
-     path: '',
-     children: []
-   }
+   { path: '', component: LandingComponent },
+   { path: 'sign-in', component: SignInComponent },
+   { path: 'sign-up', component: SignUpComponent },
+   { path: 'profile', component: ProfileComponent }
...

This gets us the very basic routing to let us see each of the new pages (at this point you can type the addresses into the browser and you should be able to see all your mundane “{component} works!” messages. Lets make this slightly more user friendly!

// header.component.html

- <p>
-   header works!
- </p>
+ <nav>
+   <a [routerLink]="['/']">Home</a>
+   <a [routerLink]="['/profile']">Profile</a>
+   <a [routerLink]="['/sign-in']">Sign In</a>
+   <a [routerLink]="['/sign-up']">Sign Up</a>
+ </nav>

That gets us a “navigation bar” with a wealth of opportunities for improvement, but should be enough to prove out the concept.

capture

Sign up and sign in HTML

Putting the whole issue of looking good aside, as that’s a whole world of its own, we can toss in a quick minimalist UI signing up and signing in.

// sign-in.component.html

- <p>
-   sign-in works!
- </p>
+ <form>
+   <input type="text" placeholder="Email address"><br>
+   <input type="password" placeholder="Password"><br>
+   <button type="submit">Sign In</button><br>
+ </form>

capture1

// sign-up.component.html

- <p>
-   sign-up works!
- </p>
+ <form>
+   <input type="text" placeholder="Username"><br>
+   <input type="text" placeholder="Email address"><br>
+   <input type="password" placeholder="Password"><br>
+   <input type="password" placeholder="Confirm Password"><br>
+   <button type="submit">Sign Up</button><br>
+ </form>

capture2
No one will accuse this of being nice looking, but it should at least do the job for now. Note that these do a whole lot of nothing as it stands, they’re just raw HTML.

Angular-ize the forms

In the interest of making the forms actually useful, we’ll have to turn the raw HTML into something Angular can use. The Angular documentation is decent, so the only kind of tricky thing is the “confirm password” validation. Luckily the documentation for that is pretty good too! First things first, we’ll swap out the FormsModule for the ReactiveFormsModule – this means we’re going to put all the logic in the TypeScript file (the component) instead of in the HTML file. This makes the code actually unit testable, and generally scales better. People who are a fan of unobtrusive JavaScript are likely to see some familiar concepts – although to be fair the HTML is marked up with JavaScript in some places, so purists be warned.

// app.module.ts
...
- import { FormsModule } from '@angular/forms';
+ import { ReactiveFormsModule } from '@angular/forms';
...
 imports: [
   BrowserModule,
-   FormsModule,
+   ReactiveFormsModule,
...

Next comes the big chunk – sewing together the HTML and the Angular code to manage it. The sign-in functionality is marginally simpler, so that’s a good place to start. Here’s what we need to do from the HTML side of things:

  1. Bind the HTML form to a FormGroup object
  2. Set all the form control names to map inputs to their corresponding validations
  3. Capture the submit event
  4. Disable the Sign In button when the form is invalid (fields aren’t filled out)

It’s all relatively straightforward, but it’s good to review the documentation if its new.

// sign-in.component.html

- <form>
-   <input type="text" placeholder="Email address"><br>
-   <input type="password" placeholder="Password"><br>
-   <button type="submit">Sign In</button><br>
+ <form [formGroup]="form" (ngSubmit)="onSignIn()">
+   <input type="text" placeholder="Email address" formControlName="email"><br>
+   <input type="password" placeholder="Password" formControlName="password"><br>
+   <button type="submit" [disabled]="!form.valid">Sign In</button><br>
</form>

From the component side of things, we need to wire everything up!

  1. Get rid of the unused OnInit
  2. Create a FormGroup to associate with the HTML form
  3. Build the desired validations for the elements
  4. Provide an onSignUp() method to invoke when the form is submitted (we’ll just log the form for now)
// sign-in.component.ts
- import { Component, OnInit } from '@angular/core';
+ import { FormBuilder, Validators, FormGroup } from '@angular/forms';
+ import { Component } from '@angular/core';

@Component({
 selector: 'app-sign-in',
 templateUrl: './sign-in.component.html',
 styleUrls: ['./sign-in.component.css']
})
- export class SignInComponent implements OnInit {
+ export class SignInComponent {

-  constructor() { }
+  private form: FormGroup;

-  ngOnInit() {
+  constructor(private formBuilder: FormBuilder) {
+    this.form = formBuilder.group({
+      "email": ["", Validators.required],
+      "password": ["", Validators.required]
+     });
+  }

+  onSignIn(email, password) {
+    console.log(this.form);
+  }

}

And that’s it for the easy one! Our form looks almost identical, but the submit button is disabled by default. On to the Sign Up form. The only real difference here is there’s an inter-field validation that happens between the two passwords – that can be tackled by nesting both inputs in a div. Other than that, everything is the same. It would be nice to put up an error message for when validations failed, but making this look nice and user friendly is a distant second priority to just pushing on ahead.

// sign-up.component.html
- <form>
-  <input type="text" placeholder="Username"><br>
-  <input type="text" placeholder="Email address"><br>
-  <input type="password" placeholder="Password"><br>
-  <input type="password" placeholder="Confirm Password"><br>
-  <button type="submit">Sign Up</button><br>
+ <form [formGroup]="form" (ngSubmit)="onSignUp()">
+   <input type="text" placeholder="Username" formControlName="username"><br>
+   <input type="text" placeholder="Email address" formControlName="email"><br>
+
+     

+     

+


+   <button type="submit" [disabled]="!form.valid">Sign Up</button><br>
</form>

And the component, with its password checking validator:

// sign-up.component.ts
- import { Component, OnInit } from '@angular/core';
+ import { Component } from '@angular/core';
+ import { FormBuilder, FormGroup, Validators } from '@angular/forms';

@Component({
 selector: 'app-sign-up',
 templateUrl: './sign-up.component.html',
 styleUrls: ['./sign-up.component.css']
})
- export class SignUpComponent implements OnInit {
+ export class SignUpComponent {

-  constructor() { }
+  private form: FormGroup;

-  ngOnInit() {
+  constructor(private formBuilder: FormBuilder) {
+    this.form = formBuilder.group({
+      "username": ["", Validators.required],
+      "email": ["", Validators.required],
+      "passwords": formBuilder.group({
+        password: ["", Validators.required],
+        repeatPassword: ["", Validators.required]
+      }, { validator: this.passwordMatchValidator })
+    });
+  }

+  onSignUp() {
+    console.log(this.form);
+  }

+  passwordMatchValidator(group: FormGroup) {
+    return group.get('password').value === group.get('repeatPassword').value
+      ? null : { 'mismatch': true };
+  }

}

And once again, our form looks identical other than the disabled button by default. Now we have forms that still don’t work, but are marginally closer to working. Progress!

Connecting ExpressJS to PostgreSQL

Creating environment variables

First things first, you don’t want to be committing your own details about the server – the username, password, host, port etc. should all be safe (generally seen as a bad idea to commit secrets to source control) and configurable. This makes it so if you want to deploy on AWS today, then DigitalOcean tomorrow, you can (kind of) just change a couple variables and you’re good to go. There are numerous ways to accomplish this, but dotenv seems to be the go-to for Node projects.

# Add dotenv
cd min-auth/min-auth-server
yarn add dotenv

# Then a file to hold your environment variables
touch .env
echo /.env >> .gitignore

Then configure your server to use dotenv, loading in the contents of the .env file. This should be done right at the beginning, so all subsequent commands have the environment variables visible.

// app.js
require('dotenv').config()

var express = require('express');
...

Now your server has visibility into any environment variables added into your .env file, and your .env file is explicitly excluded from Git.

NodeJS to PostgreSQL

Pretty much everything builds on top of one pretty standard library – node-postgres (or simply pg). From there, there are all sorts of tools that lie on a continuum of abstraction.

  • pg-promise is a popular library which trades in callbacks for promises, and provides ES6 generator support.
  • Knex is marginally more abstract, but still largely just syntactic sugar over SQL queries
  • Bookshelf is an ORM built on top of Knex – climbing up the ladder of “do you really want this, or should you just learn SQL already?
  • Sequelize is a promise based ORM that seems to avoid building directly on the other libraries, I have no personal experience with it

Once again, what to use, what to use? I’ve been somewhat put off by ActiveRecord in Ruby on Rails, so I’d like to try avoiding an ORM and see how it pans out. That means that both Sequelize and Bookshelf are out. Knex is appealing because of the ORM layer that can be tacked on to it, if I should ever find that desirable, and it also has some built in opinions about how to implement and organize migrations. pg-promise is generally more popular, and a bit lower level. I used it a bit when trying to create a module to automate the provisioning of the PostgreSQL server for web app development, and while it was okay I wasn’t blown away by it by any means. I found myself writing a lot of what I imagine Knex provides for free.

As I don’t think the database work is one of my stronger skills, I’ll opt for the more feature rich Knex.

Setting environment variables

When it comes to actually using Knex, the library has the concept of a knexfile for configuration. I don’t really know too much about it or what the intentions are, but it comes across as more of an interface between the the actual environment variables and the Knex configuration – it doesn’t quite fit in either. As I don’t really need it right now, I’ll put off using it until I get to dealing with seed files and migrations.

So first things first, set up all the environment variables. These fields should be pretty self explanatory, the names are arbitrary – they can be named whatever. To start with, we’ll connect to our development database, as we’re in development. Note that this is building off the convention used previously, i.e. the databases are named {database_name}_{environment} where environment is one of production, development or test. This is another arbitrary decision I made, this could be handled many other ways, the important aspect is that its consistent.

// .env

DB_USER=min_auth_user
DB_PASSWORD=user_password
DB_NAME=min_auth
DB_HOST=192.168.99.100
DB_PORT=5432
DB_NUM_MAX_CLIENTS=10
DB_IDLE_TIMEOUT_MILLIS=3000

NODE_ENV=development

These variables are specific to a particular machine. This should *not* be added to version control. It’s generally a bad idea to post your passwords on the internet, even if you’re just messing around. The idea here is that these values will be set specifically for each deployment environment.

ExpressJS to PostgreSQL

The next step is straight out of the Knex documentation. We’ll add a separate file, just so our app.js doesn’t get too crowded, perhaps min-auth-server/config/db.js?

// config/db.js

module.exports = require('knex')({
  client: 'pg',
  connection: {
    user: process.env.DB_USER,
    database: process.env.DB_NAME + "_" + process.env.NODE_ENV,
    password: process.env.DB_PASSWORD,
    host: process.env.DB_HOST,
    port: process.env.DB_PORT,
    max: process.env.DB_NUM_MAX_CLIENTS,
    idleTimeoutMillis: process.env.DB_IDLE_TIMEOUT_MILLIS,
  }
});

… and the corresponding require to app.js

// app.js
...
const knex = require.main.require("../config/db")
...

At this stage, if everything is as intended and the environment variables are set appropriately, Express should be able to talk to the the database! It’s nice to say that, but if there’s a typo somewhere it’s hard to tell for sure. Let’s verify the connection actually works! You can do this a million different ways, but I’ll just print out a log on the server start up. Again, in the interest of not cluttering up app.js, I’ll put it elsewhere – utils/knexUtils.js

// utils/knexUtils.js

module.exports = function (knex) {
  return {
    logVersion: function () {
      knex.raw('SELECT version()').then(function (resp) {
        dbServer = resp.rows[0].version
        return dbServer;
      }).catch(function (error) {
        console.log("Connection to database failed");
        console.error(error);
        return error;
      });
    }
  }
}

And the corresponding entry in app.js:

// app.js

...
const knex = require.main.require("../config/db")
const knexUtils = require.main.require("../utils/knexUtils")(knex);
knexUtils.logVersion();
...

Now we can give it a shot! Back in the root of the project (the parent directory of min-auth-server and min-auth-client) run the start-server task created previously:

$ yarn start-server
yarn start-server v0.19.1
$ cd min-auth-server && nodemon
[nodemon] 1.11.0
[nodemon] to restart at any time, enter `rs`
[nodemon] watching: *.*
[nodemon] starting `node ./bin/www`
Successfully connected to PostgreSQL 9.6.1 on x86_64-pc-linux-gnu, compiled by gcc (Alpine 6.2.1) 6.2.1 20160822, 64-bit

Awesome! Our ExpressJS app is now connected to the PostgreSQL server, and they’re communicating successfully. The Angular front end development workflow is working out, it can be packaged up and then delivered from the server – all of the sudden we find ourselves with a full stack!

NPM module to set up PostgreSQL for a web app

In my previous post, I laid out a basic strategy for provisioning a PostgreSQL server with the databases and users to support a deployment which respects the principle of least privilege. The big takeaway is that any given web app should likely have two extremely distinct users – one to actually set up the database (think deployment and upgrades) and one to be used once your app is running. Neither of these users should be a superuser – e.g. the default postgres user.

I’ve barely written any JavaScript before, so I don’t *really* know what I’m doing, but I put together an example to configure a PostgreSQL server for web app. Perhaps in the future I’ll make it actually usable as an NPM module, but for now it’s more of an example. It’s on NPM here and on GitHub here – essentially it just performs the steps I outlined in my previous post.

Given how JavaScript is single threaded, I found it was actually surprisingly difficult to write this bit of code. Things like creating the database *have* to finish before actions (e.g. connecting to the database) can begin, so I found it way trickier than I’d readily admit to get it working. All in all, I likely spent almost 2 full days trying to scrape it together to the point its at now. I’ve never really used Promises before, although I’ve certainly heard plenty about them. I’ve also never used Generators before. I’ve certainly never done so much work coercing asynchronous tasks to be synchronous before.

It was an interesting challenge for me, and almost completely useless as it stands, but I think it would actually be useful if I were to finish it off to the point where it could be installed as a global NPM module and invoked from the command line. Perhaps some day, but for right now I’m sick and tired of it and want to move on…

PostgreSQL for web apps

Note: I bundled this into an NPM module. It’s on NPM here and the source is on GitHub here

Set up PostgreSQL

A RDBMS needs two basic things – a database and users. The user side of this gets a little interesting though. Something I haven’t really taken into consideration before is separating the web app interactions into two distinct users. This is in keeping with the principle of least privilege, and is a security concern. During normal operation, a run-of-the-mill web app should really only be able to CRUD rows in tables. It shouldn’t be allowed to connect to other databases, it shouldn’t be allowed to create other users, and it shouldn’t be allowed to change the schema. This is the database user who feeds the front end via the server. Separately, there is more of an “administrative” role. When the web app is being updated, it may update the schema itself. This user would have more privileges than the regular user, as it should really only be used by the automated tooling that supports the web app deployment. Presumably the client (as in UI, not as in database client) should never have access to a user with these privileges.

As I don’t really know what I’m doing, I looked around for an hour or two and only really found this blog post, from a decade ago, really talking about the problem directly. It’s a bit rough around the edges, but there are some decent points in there.

Using PostgreSQL

There are various utilities like createuser and createdb that in some respects are helpful to get something done quickly. In other ways, they obscure what’s actually going on and you spend more time learning to use the utilities then just learning how to use PostgreSQL directly. To that end, we’ll connect to the database and eschew the utilities for now:

# Connect to PostgreSQL server as the default superuser "postgres"
$ psql -U "postgres" -h "192.168.99.100"
Password for user postgres:
psql (9.6.1)
Type "help" for help.

postgres=#

Administrative user

PostgreSQL documentation is pretty fantastic, so look there (link) for the difference between ROLE and USER – *spoiler alert* they’re basically the same thing, USER is just a ROLE with the LOGIN privilege. Again, obviously set the password to something that’s not terrible

# Create a user with all the default settings (no elevated privileges)
postgres=# CREATE USER "express_admin" WITH PASSWORD 'admin_password';
CREATE ROLE

Web app user

We’ll also create a user to interact with the database on behalf of the web app server. This password should be not-terrible AND not provide any hints to guessing your other password. You shouldn’t be too concerned about making these memorable, as you’ll write them down in an environment variable and then essentially forget about them.

postgres=# CREATE USER "express_user" WITH PASSWORD 'password_user';
CREATE ROLE

And take a look to make sure neither have any roles associated:

postgres=# \du
                                    List of roles
 Role name     |                        Attributes                          | Member of
---------------+------------------------------------------------------------+-----------
 express-admin |                                                            | {}
 express-user  |                                                            | {}
 postgres      | Superuser, Create role, Create DB, Replication, Bypass RLS | {}

Pretty straightforward so far.

Database

Create one! The important thing here is we need to set the owner as express_admin, NOT as express_user:

postgres=# CREATE DATABASE "min_auth_test" WITH OWNER "express_admin";
CREATE DATABASE

And check out how it looks

postgres=# \l
 List of databases
 Name                 | Owner         | Encoding | Collate    | Ctype      | Access privileges
----------------------+---------------+----------+------------+------------+-----------------------
 min-auth-test        | express-admin | UTF8     | en_US.utf8 | en_US.utf8 |

Now we have users AND a database. Well, that was easy! Or was it too easy

# Connect to test database as our least privileged user, 'express_user'
postgres=# \c min_auth_test express_user;
Password for user express_user:

You are now connected to database "min_auth_test" as user "express_user".
min_auth_test=> CREATE DATABASE "test";
ERROR: permission denied to create database

Great! Our strategy works!

min-auth-test=> CREATE TABLE "test"();
CREATE TABLE
min-auth-test=> \dt
 List of relations
 Schema | Name | Type | Owner
--------+------+-------+--------------
 public | test | table | express-user
(1 row)

# Clean up after ourselves
min-auth-test=> DROP TABLE "test";
DROP TABLE

Well dammit… those are exactly the kind of shenanigans we were trying to avoid. What’s going on here? You’ve essentially just stepped off the edge of a cliff and are now rapidly tumbling down the “how does PostgreSQL work???” line of understanding. I just want to write a web app, not learn the ins and outs of database management! To keep the focus, we’ll just push through this quickly:

# Connect to the database as your superuser
min_auth_test=> \c min_auth_test postgres
You are now connected to database "min_auth_test" as user "postgres".

# Drop the default public schema which is enabling the permissive permissions
min_auth_test=# DROP SCHEMA public;
DROP SCHEMA

# Create a different schema in its place
min_auth_test=# CREATE SCHEMA express AUTHORIZATION express_admin;
CREATE SCHEMA

# Use this new schema as the default for both users
min_auth_test=> ALTER ROLE express_admin SET search_path TO express;
ALTER_ROLE
min_auth_test=> ALTER ROLE express_user SET search_path TO express;
ALTER_ROLE

# Spoiler alert, but later on we're going to store case insensitive text
# Enable the PostgreSQL citext extension now to make it easier then
CREATE EXTENSION IF NOT EXISTS citext WITH SCHEMA express;

# We're done with the postgres superuser, so use express_admin from here on out
min_auth_test=# \c min_auth_test express_admin
Password for user express_admin:
You are now connected to database "min_auth_test" as user "express_admin".

# Give the express_user the permission to access the database, but not create anything
min_auth_test=> GRANT USAGE ON SCHEMA express TO express_user;
GRANT

# Strip permission to execute functions from that nasty PUBLIC
min_auth_test=> ALTER DEFAULT PRIVILEGES FOR ROLE express_admin
min_auth_test-> REVOKE EXECUTE ON FUNCTIONS FROM PUBLIC;
ALTER DEFAULT PRIVILEGES

# Let express_user have access to the CRUD the data in all tables
min_auth_test=> ALTER DEFAULT PRIVILEGES FOR ROLE express_admin IN SCHEMA express
min_auth_test-> GRANT SELECT, INSERT, UPDATE, DELETE ON TABLES TO express_user;
ALTER DEFAULT PRIVILEGES

# Let express_user use sequences
min_auth_test=> ALTER DEFAULT PRIVILEGES FOR ROLE express_admin IN SCHEMA express
min_auth_test-> GRANT SELECT, USAGE ON SEQUENCES TO express_user;
ALTER DEFAULT PRIVILEGES

# Let express_user use functions
min_auth_test=> ALTER DEFAULT PRIVILEGES FOR ROLE express_admin IN SCHEMA express
min_auth_test-> GRANT EXECUTE ON FUNCTIONS TO express_user;
ALTER DEFAULT PRIVILEGES

Now we’ve got a bit more of an intentional setup, let’s try testing it out again.

# Admin can do admin-y things on our database?
min_auth_test=> CREATE TABLE express.test();
CREATE TABLE
min_auth_test=> DROP TABLE express.test;
DROP TABLE

# Admin can't do admin-y things outside of our database
min_auth_test=> CREATE DATABASE testy_test_test;
ERROR: permission denied to create database

# User can't do admin-y things on our database
min_auth_test=> \c min_auth_test express_user;
Password for user express_user:
You are now connected to database "min_auth_test" as user "express_user".
min_auth_test=> CREATE TABLE express.test();
ERROR: permission denied for schema express
LINE 1: CREATE TABLE express.test();

Beautiful! Seems to be working as designed. Let’s create a couple more databases so we can handle our environments separately.

min_auth_test=> \c postgres postgres
Password for user postgres:
You are now connected to database "postgres" as user "postgres".
postgres=# CREATE DATABASE min_auth_development WITH TEMPLATE min_auth_test OWNER express_admin;
CREATE DATABASE
postgres=# CREATE DATABASE min_auth_production WITH TEMPLATE min_auth_test OWNER express_admin;
CREATE DATABASE

And take a look:


postgres=# \l
                                           List of databases
           Name           |     Owner     | Encoding |  Collate   |   Ctype    |   Access privileges
--------------------------+---------------+----------+------------+------------+-----------------------
 min_auth_development     | express_admin | UTF8     | en_US.utf8 | en_US.utf8 |
 min_auth_production      | express_admin | UTF8     | en_US.utf8 | en_US.utf8 |
 min_auth_test            | express_admin | UTF8     | en_US.utf8 | en_US.utf8 |
 postgres                 | postgres      | UTF8     | en_US.utf8 | en_US.utf8 |
 template0                | postgres      | UTF8     | en_US.utf8 | en_US.utf8 | =c/postgres          +
                          |               |          |            |            | postgres=CTc/postgres
 template1                | postgres      | UTF8     | en_US.utf8 | en_US.utf8 | =c/postgres          +
                          |               |          |            |            | postgres=CTc/postgres
(6 rows)

Looks good to me! Try it out to be sure:

postgres=# \c min_auth_development express_admin;
Password for user express_admin:
You are now connected to database "min_auth_development" as user "express_admin".
min_auth_development=> CREATE TABLE express.test();
CREATE TABLE
min_auth_development=> DROP TABLE express.test;
DROP TABLE

min_auth_development=> \c min_auth_development express_user;
Password for user express_user:
You are now connected to database "min_auth_development" as user "express_user".
min_auth_development=> CREATE TABLE express.test();
ERROR: permission denied for schema express
LINE 1: CREATE TABLE express.test();

Awesome! A few databases ready to go, and a permission model that keeps the main application user from doing what its not supposed to. It’d be nice to encapsulate this all so that we can do it programmatically…

PostgreSQL with Docker

Docker?

First and foremost, one of the easiest ways to get started with PostgreSQL is via Docker. Why?

  • Right off the bat it gets you thinking about interacting with a database that is not co-located with the application server. Down the road, if you want to cut over to Amazon RDS or something similar, many of the related issues have already been dealt with.
  • Right off the bat it gets you thinking about programatically provisioning the database. If you can start up new database instances in a second, it sure would be handy to be able to get them set up so your app could use them automatically…
  • It’s completely trivial to try different versions of PostgreSQL. You can easily run version 9.2 all the way through to 9.6 side by side, which is much more of a pain to do if installing them all natively.
  • It gets you thinking about automated build and testing infrastructure – starting, provisioning, and upgrading Docker containers is generally easier than installing and upgrading native installations.
  • It puts you in position to deploy not just your dependency on PostgreSQL, but also deploy your configuration exactly the way you want it with no extra work.

If you’re using Linux, getting set up with Docker is completely trivial. Follow the plentiful instructions available on the web, and you’re good to go.

I’m not sure how it plays out on MacOS, but on Windows it’s a bit of a nightmare. If you have particularly old hardware, you may as well just give up. Start VirtualBox and run Docker in there, I guess? If you have new enough hardware but not a pro version of Windows it’s doable, but is buggy and sucks as you’ll have to go the Docker Toolbox route. If you have new hardware AND a pro version of Windows, then you can use Docker with the Hyper-V, but it means you’re out of luck when it comes to running other virtual machines (or you have to reboot in between, which is basically a non-starter). On Windows, I had the most luck uninstalling everything (Git, VirtualBox etc.) then installing Docker Toolbox, then upgrading after Docker Toolbox is installed. On Linux I had no problems at all with anything. Just saying…

Docker!

Once you have Docker installed, it’s time to start up PostgreSQL. When I was first looking at Docker and trying to figure my way around, I looked at this vey helpful blog post. The short answer to get Docker to run *almost* as though you had installed it natively is with the following command (change POSTGRES_PASSWORD to virtually anything else):

docker run --restart=always -p 5432:5432 --name postgres -e POSTGRES_PASSWORD=password -d postgres:alpine

Definitely worth looking at it and understanding it a bit more. One of the important quirks of using PostgreSQL this way is that it doesn’t work by default to connect with a local psql installation i.e. psql -U postgres won’t be able to find the server, despite port 5432 being forwarded correctly. On Linux, the default connection is binding to a socket (which is not forwarded from the Docker container), so to connect to PostgreSQL you’ll need to specify the host – psql -U postgres -h localhost or similar. There’s a performance cost here, but it’ll be reasonably inconsequential for the beginnings of the app. Alternatively, you can jump into your running Docker container and connect to PostgreSQL directly

And that’s all there is to that – PostgreSQL is running and usable. If you want a specific version, you can get a specific version. If you want to see what happens with your server/app when the PostgreSQL server goes down, or what fails when the “machine” running PostgreSQL runs out of resources, Docker gives you an excellent avenue to test and play around without causing any real harm or botching your host machine up.

You’ll need to get the PostgreSQL client set up to be able to connect from your machine. Alternatively, you could jump into the Docker container itself to execute, or you could run psql from yet another Docker container…

Angular and Express build tooling

In my previous post I deployed the Angular build artifacts to the Express server with a good ol’ copy-paste. This works the first time, but is definitely not a great solution for something seeing continuous development. Surely there’s got to be a better way! Where does that leave us? This is the part where theory and practice collide, but I contend its in a good way that makes us think about what we’re doing and what we want to do.

While developing the client:

  1. We want to take advantage of the live reloading and tooling in general available to Angular client development
    • We can accomplish this with the very handy ng serve --watch
  2. We want the Angular client to talk to the server, whether we’re actively developing the server or not
    • Likewise the Angular CLI has this built in: ng serve –proxy http://localhost:3000 this means we’re still using the Angular development server to actually serve the application, but any API calls are being forwarded to our real server – Express.
  3. We want to be able to deploy the client easily to our server so we can try it in production mode
    • Not quite sure what the solution is for this. We may need some additional tooling to support this case
    • Angular supports the --watch flag for ng build as well, this may be part of the solution

While developing the server:

  1. We want to monitor the server files and restart the server when any change
    • Surprise surprise, we’re not the first ones to think of this. nodemon does exactly this.
    • yarn add --dev nodemon
    • Instead of yarn start, just invoke nodemon in min-auth/min-auth-server/
  2. If we’re not developing the client, we want to use the most recent build of the client
    • Whatever the solution is here, its likely the the same as the client side desire #3 above
  3. We want to be able to deploy the server easily
    • I haven’t even started looking at this yet…

Move production Angular artifacts to Express server

This is the crux of the integration – how do we get production artifacts created by the Angular build process into Express so that Express can serve them up? A side effect of the whole motivation of decoupling technologies like this is that the solution may not be plug-and-play. What do we actually want to do here?

  • Clean any old versions of our client lying around
  • Build the Angular application artifacts
  • Copy the Angular artifacts into Express

Seems easy enough! Sticking with the Node tooling, we may as well do this with JavaScript. In the root min-auth/ folder, we can do:

$ yarn init

And answer all the questions that follow:

yarn init v0.18.1
question name (min-auth):
question version (1.0.0):
question description:
question entry point (index.js):
question git repository (https://github.com/tobymurray/min-auth.git):
question author (Toby Murray <email@email.email>):
question license (MIT):
success Saved package.json
Done in 14.42s.

This is conceptually creating a package with both min-auth-server and min-auth-client inside it, which is exactly what we need to integrate the two.

Node build script

We can do everything in JavaScript, so why not? Note that this is intended to be closer to the “quick and dirty” implementation than the “robust multi-platform multi-technology” tool. We’ll make a build.js to encapsulate the actual build logic, although there’s not much to it, so it probably wouldn’t be crazy to do it inline either.

So as to not re-write the wheel, we’ll use fs-extra. Add it to your local dependencies:

yarn add fs-extra --dev

Now use it!

// min-auth/build.js

var fse = require('fs-extra');
var p = require("path");

const PUBLIC_FOLDER = p.join("min-auth-server", "public");
const DIST_FOLDER = p.join("min-auth-client", "dist");

// Delete anything that's hanging around in the public folder, as right now we have nothing we want to keep around
fse.removeSync(PUBLIC_FOLDER)

// Copy the build artifacts from Angular to Express
fse.copySync(DIST_FOLDER, PUBLIC_FOLDER)

Then we can add some scripts to the package.json to make this a bit more convenient:

// min-auth/package.json - exclude this as JSON has no comments

{
  "name": "min-auth",
  "version": "1.0.0",
  "main": "build.js",
  "repository": "https://github.com/tobymurray/min-auth.git",
  "author": "Toby Murray <email@email.email>",
  "license": "MIT",
  "scripts": {
    "build-client": "cd min-auth-client && yarn && ng build --prod --aot && cd ..",
    "deploy-client": "yarn && node build.js",
    "build": "yarn build-client && yarn deploy-client && cd .."
  },
  "devDependencies": {
    "fs-extra": "^1.0.0"
  }
}

Serve it up!

Give it a shot – in min-auth invoke yarn run build:

$ yarn run build
yarn run v0.18.1
$ yarn build-client && yarn deploy-client
yarn build-client v0.18.1
$ cd min-auth-client && ng build --prod --aot
Hash: 0ff826d3d954c66776c3
Time: 23700ms
chunk {0} main.26330a263e64118bcace.bundle.js, main.26330a263e64118bcace.bundle.map (main) 45.1 kB {2} [initial] [rendered]
chunk {1} styles.1a2c149cb14baba676ab.bundle.css, styles.1a2c149cb14baba676ab.bundle.map, styles.1a2c149cb14baba676ab.bundle.map (styles) 1.69 kB {3} [initial] [rendered]
chunk {2} vendor.c94b330d9f9311379542.bundle.js, vendor.c94b330d9f9311379542.bundle.map (vendor) 1.69 MB [initial] [rendered]
chunk {3} inline.34fbd289d5d0c10e3d2b.bundle.js, inline.34fbd289d5d0c10e3d2b.bundle.map (inline) 0 bytes [entry] [rendered]
Done in 28.69s.
yarn deploy-client v0.18.1
$ node build.js
Done in 0.54s.
Done in 30.10s.

Run it the same old way:

cd min-auth-server && SET DEBUG=min-auth-server:* & yarn start
yarn start v0.18.1
$ node ./bin/www
 min-auth-server:server Listening on port 3000 +0ms

Or why not add a convenience method in package.json now that we have it?

// 
"scripts": {
  "start-server": "cd min-auth-server && nodemon",
  ...

We can now start the server and watch for changes with with yarn run start-server. We can also keep going, adding tasks and combining them into other tasks, but we can do all this as it comes up.

Alright! We can develop the client side in Angular, and independently develop the server side in Express, as well as build the client side in a consistent and automated fashion, deploying it with Express… we’ve just about got the bare minimum required to get this stack working effectively!

Serving Angular with Express

Preamble

As I mentioned before, the Angular CLI has the ability to deploy to GitHub Pages. This is a great way to showcase the client side of the the application, but doesn’t offer anything for the server side. It also makes it a bit more difficult to work with the Angular CLI when the file structure doesn’t exactly line up with expected layout. That brings up to an important point – how do you structure the project?

Yet another consideration at this stage is the overall deployment strategy. There are definitely tools that provide the end to end solution – handling the client side and server side in one shot. Work on the Angular application, work on the server, click the magic button and everything works. The downside is that usually they suck a bit. Unless the developers behind the integration tool are super keeners, they struggle with keeping up to date, especially as time wears on and the initial enthusiasm behind the integration of the two technologies wanes. Relying on someone else for integration can easily come at the price of using the latest technology, or perhaps just having your hands tied when it comes to design or tooling decisions. A good example of this is the MEAN stack, available at mean.io – what if you want, for example, to use PostgreSQL instead of MongoDB? The project also seems to be a bit underwater in terms of organization, which is to be expected for fast moving technologies but also makes it hard to jump on board.

Given that I’ve chosen to work with Express for this first attempt, what’s the easiest way to serve an Angular application? The short answer is that I’m not really sure. I don’t know what the story is for deploying Node applications – when I look around, people talk about running npm install on the server and that strikes me as crazy. I was going a bit nutty, thinking a deterministic deployment story was priority 1 for production code, thankfully Yarn stepped in and validated my concerns. I’ll look into it more, but in the interest of moving forward, I’ll make it up as I go. Sticking with the “generator” route, why not opt for the Express Generator? I don’t have much experience with it, so I figured it might be worth looking into. At least it gives a common starting point.

Setting up Express

$ yarn global add express-generator
$ express --view=ejs --git min-auth-server
$ cd min-auth-server && yarn

We’re only going to serve up the Angular UI, so we can remove the placeholder UI and routing things – we’ll be adding our own with Angular:

$ rm views/index.ejs
$ rm routes/*
$ rm public/stylesheets/style.css

# Delete the associated routing from app.js
- var index = require('./routes/index');
- var users = require('./routes/users');
...
- app.use('/', index);
- app.use('/users', users);

You can also uncomment the app.use(favicon... line, as Angular CLI provides a favicon out of the box. Better to have something than nothing! This is also a good time to save your work:

$ git add .
$ git commit -m "Initial commit for server"

Deployment time!

For a first pass at integration, we’ll do it in a brutish, manual fashion as a proof of concept

# Build Angular application
$ ng build --prod --aot

# Copy the now-built Angular artifacts into the server 
$ cp -a min-auth-client/dist/. min-auth-server/public/

Now we can actually get this application moving, ignoring that it would suck to have to do this every time we wanted to deploy the client to the server.

# In Windows:
$ SET DEBUG=min-auth-server:* & yarn start

# In Linux:
$ DEBUG=min-auth-server:* yarn start

$ yarn start v0.18.1
$ node ./bin/www
 min-auth-server:server Listening on port 3000 +0ms

Now you should be able to visit localhost:3000 and see our Node JS server with Express serving up our Angular application! May not look like much right now, but we’re laying the foundations, and this is a crucial piece of integration.

expressservingangular

Build Angular and serve with Express automatically

The current status of Node + Angular applications appears to have everything live in the same directory. My guess is that this is the path of least resistance, so that’s the way people start doing it. Perhaps overgeneralizing, but Node servers seem to be closer to the disposable realm than long lived enterprise projects, so perhaps people have yet to run into issues scaling, or just solve it in their own custom fashion. There are numerous examples online of, for example, people invoking ng new and then creating an app.js to serve the dist folder, or renaming the dist folder to public and serving that. While this works and is easy, it also takes the two very separate and modular technologies and couples them right together. As the application grows, it becomes more and more difficult to differentiate between the development server, the production server, the Angular development server, and the Angular production artifacts, and the deployment process. I personally value a strong separation between the various concerns – developing the client is generally different than developing the server, which is likewise different than deploying the app. It’s much easier to understand what you’re deploying if you have both a logical and physical separation between the client and the server, which usually gives you a better chance of deploying only what you need.

Unless I find something that fits exactly the purpose, I imagine the easiest way forward will be to quickly whip up some “build” tooling. I’ll take a look around and see what I come up with…

Angular development with CLI and Yarn

Setting up an Angular project

Best (and evolving) way to install Yarn is by following the project’s documentation: https://yarnpkg.com/en/docs/install

Once that’s done, add the Angular CLI. It hasn’t hit version 1 as of this writing, and shows with quite a few bugs and reasonably large changes between versions. That said, it seems to be extremely active and captures best practices nicely. I’ve also added some Git stuff in here, as I’m a strong believer you should pretty much always be using Git. Worst case scenario, you have a bunch of old repositories lying around that never went anywhere. More often than not I find value in looking back at what I did before, seeing the commits that fix “gotchas” etc. One step even better than that is to push everything to GitHub. Free backups? Why not! So lets create a new app and install the dependencies:

# At the time of writing, Angular CLI is version 1.0.0-beta.24
$ yarn global add angular-cli
# Create a folder to contain the application, and initialize the Git repository
$ mkdir min-auth && cd min-auth
$ git init
$ ng new min-auth-client --inline-style --inline-template --skip-npm --routing --skip-git
... create the Angular app structure avoiding some unnecessary features
# Initialize the Git repository and add the first slew of files
$ git add .
$ git commit -m "Initial commit for client"
$ cd min-auth-client && yarn
... creates the Yarn lock file and installs dependencies

Start up the development server, just to make sure everything is working as expected.

$ ng serve

Minimal routing

Any nontrivial single page application will have to have some concept of routing. The Angular CLI doesn’t appear to officially support it at the current time, but the --routing flag appears to do all the right things. It adds app-routing.module.ts with the appropriate import in app.module.ts, and the router-outlet tag.

This provides a handy level of indirection which makes the application easier to grow. For example, if we want a persistent header, adding it in the app.component.ts (or HTML) file is a great spot for it that logically separates the “body” of the app from the header. It would likewise be trivial to bootstrap a different component in AppModule, so not a big deal either way.

$ ng serve
angularstart

Great success!

Alright, absolute bare-bones Angular application generated with the CLI, and the most basic routing included as well! Code is available on GitHub here.

As an added bonus, deploying to GitHub Pages is completely trivial at this stage if you had used a single folder, and it is also high on the “look, I did a thing!” scale. Had I not initialized the Git repository in min-auth/ and created the Angular app in min-auth/min-auth-client and instead used min-auth-client as the root, this would work as expected:

$ ng github-pages:deploy
Hash: 82197d964b54510e2ceb
Time: 25326ms
chunk {0} main.bfa660af43c9b45d24db.bundle.js, main.bfa660af43c9b45d24db.bundle.map (main) 2.91 MB {2} [initial] [rendered]
chunk {1} styles.7afa3f8183149d20131c.bundle.css, styles.7afa3f8183149d20131c.bundle.map, styles.7afa3f8183149d20131c.bundle.map (styles) 1.69 kB {2} [initial] [rendered]
chunk {2} inline.0f7fe92dabe7c163ef1c.bundle.js, inline.0f7fe92dabe7c163ef1c.bundle.map (inline) 0 bytes [entry] [rendered]
Deployed! Visit https://tobymurray.github.io//min-auth-client//
Github pages might take a few minutes to show the deployed site.

As the message says, you can then go visit (e.g.) https://tobymurray.github.io/min-auth-client/ and see the not-that-interesting-yet-still-tangible starting point for the application. This is largely the same as what you see when you do ng serve, but other people can look at it too! Unfortunately this doesn’t appear to work out of the box with the Angular CLI and GitHub Pages, as Pages is expecting an index.html in the root of the repository. You could certainly deploy it manually, but that takes most of the fun out of it.

Where are we going – the back end

When trying to decide what stack to use, inevitably there will be two main differentiated technologies right off the bat – opinionated and unopinionated frameworks. Generally speaking, the difference is “do I want to be super frustrated later on, or right from the beginning?”.

Opinionated Frameworks

A good way to start when you don’t have much experience  and you don’t want to make many decisions is with an opinionated framework. They provide a much lower barrier to entry. You generally don’t have to know how to do things until you realize something is not working the way you want it to. A little “ignorance is bliss” can pay off in terms of spending time building something someone can see instead of working out tooling. The pain comes when you want to replace a piece of the opinionated framework with something else – all of the sudden you need to become a super expert and pull back all the curtains.


Which opinionated framework?

Are you making a single page application (you never refresh the page, UI elements show up and disappear smoothly) where most of the functionality is in the UI?

Are you making a multi page application with all its “back button actually works”, “wait while it refreshes” goodness?

  • Are you making a “traditional” application where you just want to get data from here and put it over there in a table?
  • Are you working on something fundamentally rooted in science or mathematics?

Unopinionated Frameworks

This is where everything goes all to hell. The definitions of “unopinionated” and “framework” both begin to break down. I’m going to use “framework” to refer to everything, even though that may be unfair, just because I don’t have a better word. Various technologies fall on different places of both the spectrum of opinions and their modularity – whether they consider themselves a library or a framework or a module or whatever. By the time you’ve read enough to feel like you’ve got a good grasp on the landscape, a new major version of FrameworkJS has been released and FrameworkJS version old is really falling out of favor.

I’m already decided on both PostgreSQL and Angular JS, I’m thinking it’d be most useful to try and sew together some unopinionated pieces. This will also provide me some insight into the strengths and weaknesses that emerge when compared to what I usually work with – Ruby on Rails. The available web frameworks are typically pretty heavily tied to a particular language.

JavaScript

NodeJS is *so* popular right now. It seems everyone is now convinced that the only difference between front-end developers and back-end developers what what language they use… This has given rise to a huge number of technologies to support the fad. I have to say, I love this video (don’t watch if you’re delicate and infatuated with Node). If going down the NodeJS route, I would be seriously tempted to get TypeScript set up and go that route.

  • ExpressJS – minimalist and unopinionated, a very thin wrapper over Node, just enough to make it a “web framework”. The lightweight nature is appealing, as there is very little “magic” happening, but the lack of structure and community developed best practices is a bit intimating – they take “unopinionated” seriously! The Sinatra of the JavaScript world. It’s easy to get lost while adding all the things that come in a more structured framework. It has a generator, but my personal experience is that it’s not really used as much as other frameworks.
  • Sails – ExpressJS + opinions = Sails. Session management and ORM choices etc. let the developer stop worrying about the absolute basics and get on with the other aspects of your application development. The Ruby on Rails of the JavaScript world. I haven’t used Sails, but it looks interesting enough that I’ll investigate it a bit.
  • Koa – strikes me as very similar to ExpressJS but it trades new features for stability. At this moment its in the awkward middle phase between version 1 and version 2. This means I’ll be giving it a bit of time to settle before I look into it too closely. If I were looking had at Express I’d definitely take a look at Koa to see which I felt I liked more.
  • Hapi – a bit more of an industrial Node based framework. It’s backed by WalmartLabs, so presumably has a bit of staying power, but I must say I’ve never looked at the Walmart website and said anything other than “this kind of sucks”. On the surface, it looks like it may be a better choice for teams or more REST based servers.
  • A million other ones, everyone is jumping on this bandwagon.

c#

  • ASP.NET – My impression is that this is pretty hugely popular, particularly in the enterprise space. A long history, a stable and performant technology, and an abundance of tooling supported by big names all yield a pretty solid choice. I’ve barely written any C# and I’ve never used ASP.NET, so I don’t have much to say about it personally. It seems like a good choice if you’re in the Microsoft ecosystem, or if you’re coming from one of the various C dialects.

Java

  • Spring – very enterprise oriented, in the same neighborhood as ASP.NET. I used it a little bit a few years back and became a little bit overwhelmed by it. The options to use XML configuration or annotations are handy if you understand them, but they’re confusing to start out with as there are generally two ways to do every task. Anything annotation driven leans very heavily on the tooling to be able to navigate and refactor appropriately, so I definitely wouldn’t want to write a Spring application without a fully featured IDE. Not my first choice for personal projects, but a definitely a strong contender for larger efforts.

Scala

  • Play Framework – could be used with Java, but definitely comes across as intended for Scala (even more so with Play 2). I think my number one biggest issue with it is the terrible Google-ability of “Play”. I tried doing a sample app when it was still quite new, and spent most of my time being enraged as I got irrelevant search results. Looking around now, information discovery seems to be much better, so I might give it another try. It generally doesn’t look like it has much buy in from big companies. Lots of people play with it (excuse the pun), but I don’t see a lot of people keeping it around. The 2.3 – 2.4 upgrade debacle seems to have cut a lot of teams loose.

C++

  • CppCMS – I wasn’t even aware this existed until writing this. For whatever reason, C++ is not typically associated with web development. Definitely not my first choice on popularity alone, although I’m sure it punches above its weight. Based on virtually nothing at all, I’d guess it’s similar to the Play Framework – lots right about it, but little traction.

Python

  •  Flask – I don’t often use Python, so I’m really not too well informed about the Python ecosystem. Flask appears to be active and popular, and if I were already strong in Python I would likely consider it in the same realm as Express for JavaScript and Sinatra for Node. Lightweight, low barrier to entry, freedom to shoot yourself in the foot at scale type of offering.

Ruby

  • Sinatra – I’ve used Sinatra for a handful of things, always small projects though. Very lightweight, very approachable syntax, a bit shocking in the terseness. If you don’t need the ORM-ness and asset pipeline of Rails, it would make for an interesting pros and cons list deciding between the two. Definitely a solid choice for getting simple endpoints up and running.

PHP

I don’t use or like PHP, I’m not really interested in looking up too much about the available technologies, so here are some Google results:

  • Symfony – Googling around shows that it is generally peaked and is being surpassed by Laravel
  • Laravel – appears to be the new darling of the PHP web development world


This is by no means a complete list, but hopefully it’s a decent overview of some of the top offerings as they stand right now.

What to use?

So what am *I* going to use right now as I get moving with this project? I’m not sure what all the fuss is about in the NodeJS world, so I’d like to take a stab at a JavaScript framework. NOT because I think its the best technology, or has any particular advantages, but because the whole world is blowing up with NodeJS love right now and I want to be able to have informed discussions as to why. If I had any plans on scaling or longevity, I would be looking elsewhere – a technology built on a statically typed language for sure, but as this is more an exercise than a deliverable I’m looking to learn. With that in mind, I’m going to try Express and see where that gets me. Hopefully it shouldn’t be too hard to abandon if I immediately regret everything about it. Additionally, I’d like to try and use TypeScript instead of vanilla JavaScript, so I’ll take a look at how possible that is.

How to get there – the front end

With the database choice all figured out, the two remaining pieces are the front end technology and the back end technology. I mentioned before that I want to use Angular on the front end for a couple reasons. First and foremost, it’s the new technology being introduced in my professional life, so I want to become familiar with it. Secondly, it seems like a competitive, modern framework. The “other” contender seems to be React + supporting software. React is constantly gaining popularity, so it definitely seems like a valuable thing to be familiar with, but I imagine I’ll already be overwhelmed using something I’m marginally familiar with.

If I actually manage to get anywhere with this project, perhaps I’ll revisit it and try out React and related technologies to see how they go. My intention is to have the front end completely decoupled from the back end, so perhaps there will be an opportunity to play with multiple front end technologies.

So.. Angular it is! I’ll do up a minimal Angular application to try and start sorting out the end to end interaction and get something to actually look at and play with.

The Plan

Starting from the ground up, the absolute basics that are required are:

Bare necessities:

  • Development infrastructure set up
    • database – should be easy to set up
    • server – a big ol’ question mark right now
    • client – the Angular CLI pretty much handles this
  • Development environment for both the server and the client
  • Deployment story for the whole application

While a lot of this can be accomplished in a vacuum, it’s always nice to have something tangible to drive it. Not only is it more satisfying, but it often shows mistakes that otherwise would have been glossed over if there were no real content being used. For example, how do you know your configuration for linking your server to the database really works unless you have an actual call from the server to the database?

First feature

For the style of web application I intend to make, one of the fundamental pieces will be authentication and authorization. Users have to be able to sign up, sign in, sign out, and delete their account. The users access also has to be heavily restricted if they’re not signed in, and slightly restricted if they are signed in – e.g. they’re not an administrator, so they can’t see system settings. Almost regardless of what the web app ends up being and how it ends up looking, user management is a key piece. Where better to start? This will also span the whole stack, so it makes for good motivation to get moving.

Client side:

  • Ability to sign up users
  • Ability for users to sign in
  • An indication of whether a user is currently signed in or not
  • Functionality to block users from accessing certain pages
  • The client side piece of session management

Server side:

  • Add users
    • Store usernames
    • Store passwords The Right Way
  • Delete users
  • Log users in
    • Determine whether provided username and password are correct
    • Server side piece of session management

I’m sure I’ve missed some things, so I’ll add them as I go.